Release v6.15
| Release Name | v6.15 |
| Release Date | 30 Nov 2021 |
| Release Status | COMPLETE |
This Release updates the below modules:
- Service Core
- Portal
- SmartUI
Main updates are as follows:
- Adding a new “Digital ID” issue flag and flagging profile as “Needs Attention” where customer has used a Digital ID
- Better handling of multiple business names in Business reports and portal
- Bug fix to better handle errors from Equifax and Experian credit header checks
- Add additional logging to IDV service to better manage hash’s related to document uploads
- Support of National ID (Social Security Number) in Frankie API
- Release of a new Smart UI branch (v4)
Digital ID flagged as needs attention
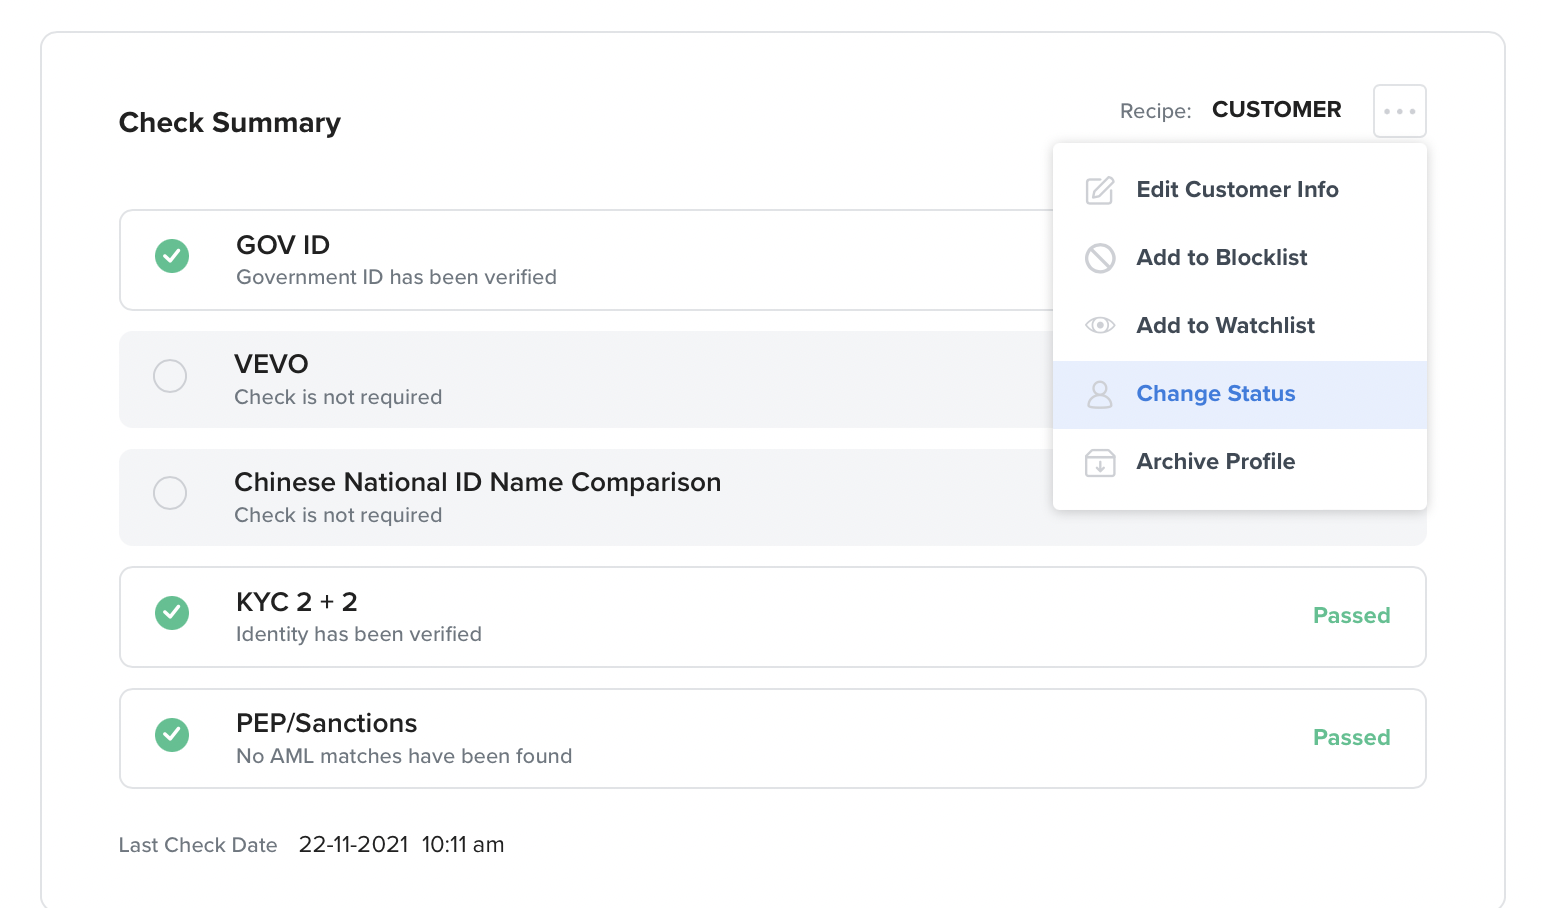
Customers who complete their onboarding with a Digital ID will now have an issue flag (Digital ID) and will be flagged as “Needs Attention”. From here, portal users can then follow up with the customer for additional information or request customer to restart the Biometrics process.

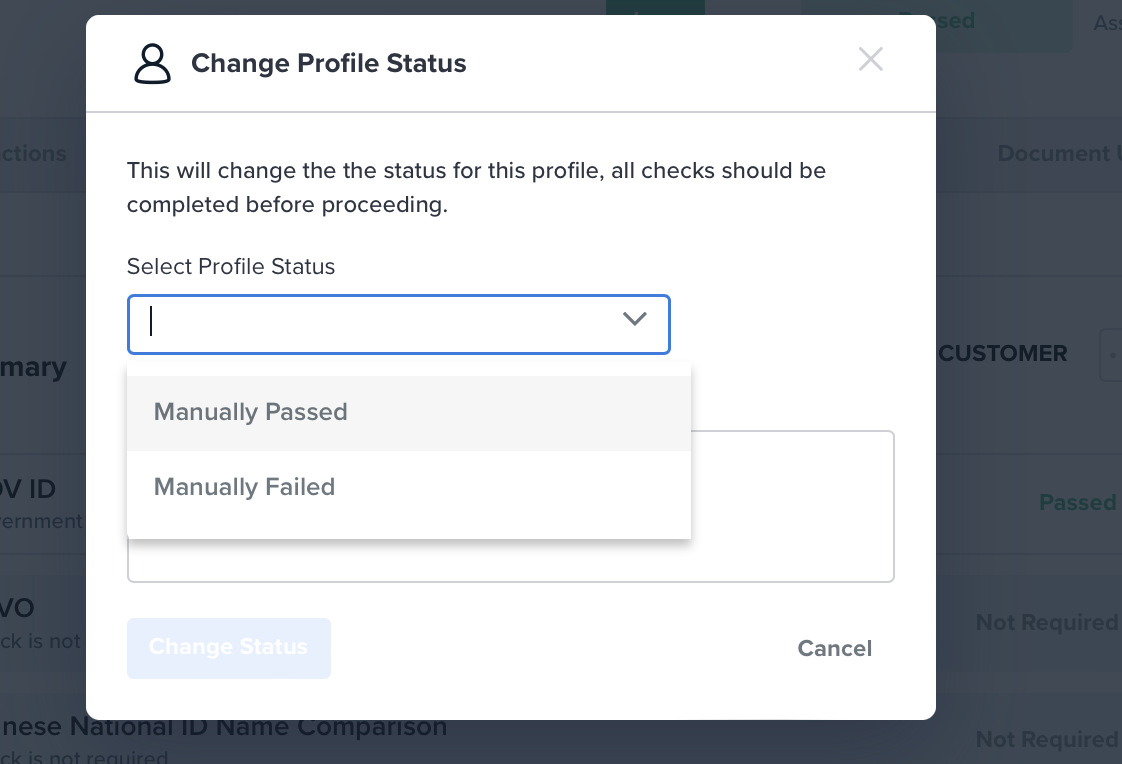
Note: Profile will need to be Manually Passed once outstanding checks have been resolved. Portal users may need an update user permissions (Override Entity Profile Status) for this.


Smart UI v4
We have upgraded our SmartUI to a Major Version. This version is available for you to test and migrate to today. Benefits of moving to new version of the SmartUI are below:
| Item | Customer Benefit |
| Faster load times | 70% reduction in SmartUI load time enabling faster onboarding and reduced chance of potential drop outs |
| HTML consent text | Ability to apply HTML as consent script |
| More configurations | Ability to config (turn on or off): 1. Digital Drivers License 2. Enable “Gender” capture 3. Enable “Marital Status” capture |
| SmartUI in additional countries | Onboard customers in 1. Singapore 2. Indonesia 3. Thailand |
| Upload Support Documents | Our customers are at times required to provide supplementary documents to support a verification check e.g. Proof of Address or House Registration/Rental Agreement. These support documents cannot be verified against a public database and require manual verification. To solve for this use case we have developed a document page within the within the smartUI. Please reach out to your account manager before turning this on. |
| More phrases | Phrases allow you to bring your own copy across the smartUI. In latest version you will get complete coverage across each and every page |
How to test new Smart UI in your own enviroment:
- You will need to use this config:
IWidgetConfiguration {
  idScanVerification: boolean | {
    releaseVersion: string,
    welcomeScreen: boolean | {
      title: string,
      content: string[],
      ctaText: boolean | string,
    },
    useMobileDevice: boolean,
    useLiveness: boolean,
    injectedCss: string;
    enableLiveDocumentCapture: boolean,
    language:  {[key: string] : IWidgetConfiguration['phrases']} | null,
  };
  // if your organisation has a special Frankie Backend URL, provide it here. If that's not your case, skip this configuration.
  frankieBackendUrl: string;
  // documentTypes can has the type of enumIdType[] or {type: enumIdType, ...config}[] to specify the config of the document
  documentTypes: TDocumentTypes;
  welcomeScreen: boolean | {
    // html string to be displayed in the welcome screen. It accepts style tags, but script tags will be stripped out.
    // the default welcome screen is available in the screenshot at the end of section "Demo" above
    htmlContent: string | boolean;
    ctaText: boolean | string;
  };
  // the number of times the applicant will be allowed to review their details and try new documents before failing their application
  maxAttemptCount: number;
  // An object containing the keys you want to customise and add in custom text to specific screens. The keys can be found in <<URL>>.
  // They can be passed as a nested object or as a string using the dot notation for nested values.
  phrases:  {[key: string] : unknown} | null,
  successScreen: {
    // url to redirect after applicant clicks button in the successful page
    // by default the widget only displays a successful message
    // you can always include the applicant-reference as a query parameter to continue any remaining onboarding steps that might come after the identity verification
    // as any traditional html link, ctaUrl can also include a call to a global javascript function, "javascript:ffSuccess('string-with-applicant-reference')"
    ctaUrl: string | null;
    ctaText: string;
  };
  pendingScreen: boolean |{
    // configuration for pending screen, when KYC passes but there are other issues to be resolved
    // such as PEP failure, Adverse Media and others
    // similarly to welcome screen, the content of this page is configurable as a html string
    // also similarly to successScreen and failureScreen, it's possible to configure cta actions, this time as an array,
    // allowing multiple actions, such as "Contact Us", which redirects to your contact form, and possibly another "Proceed",
    // which could take the user to another step in the onboarding flow

    // htmlContent is an html string to be displayed. Accepts style tags, but script tags will be stripped out.
    // any non string value, including undefined (absent value), will result in using our default message, as specified in the screenshot in the section "Demo"
    htmlContent: string | null,
    // cta actions is an array of objects describing cta anchor tags styled as buttons and shown below htmlContent
    // each element of the array is a cta object, where cta.url is the value that goes in a.href and cta.text is the label of the button
    // as a reminder, values in a.href can include javascript, which can be used to call a global function, exactly as described in successScreen
    ctaActions: { url: string, text: string }[];
  };
  failureScreen: boolean | {
    // url to redirect after applicant clicks button when onboarding has failed
    // by default the widget only displays a failure message
    // you can always include the applicant-reference as a query parameter to provide any further steps
    // as any traditional html link, ctaUrl can also include a call to a global javascript function, "javascript:ffFailure('string-with-applicant-reference')"
    ctaUrl: string | null;
    ctaText: string;
  };
  // If the progress bar should be rendered
  progressBar: boolean;
  // A "profile" is a collection or recipe of rules and checks that you wish to perform on all of your customers.
  // As part of the onboarding process with Frankie, we'll work with you to define these.
  // However, the service also makes it easy to automate this and you can just use "auto" to have our rules engine work this out for you.
  // Unless told otherwise by Frankie, use "auto".
  checkProfile: string;
  // Google api key for the address auto complete. For the demo we provide our own api automatically.
  // Otherwise if this field is missing the widget will skip the address autocomplete screen.
  // More information right after this code block
  googleAPIKey: string | false;
  // List of up to 5 char2 country codes to include in the country dropdown and in the address autocomplete
  acceptedCountries: string[];
  // Tuple of two numeric values minimumAge and maximumAge
  ageRange: [number, number];
  dateOfBirth: TConfigDOB;
  // your organisation name
  organisationName: string;
  // The text which you would like to display to your users when asking for their consent to run the checks.
  // if not provided it will display the default consent message provided by Frankie.
  consentText: string | null;
  // Request address for KYC checks
  requestAddress: boolean;
  // Request identification documents
  requestID: boolean;
  // Push ID checks to after KYC checks and only if they fail
  lazyIDCheck: boolean;
  // disables capturing third-party analytics
  disableThirdPartyAnalytics: boolean;
  // you can set CSS that will be available in Shadow DOM.
  injectedCss: string;
  // OR you can set a style tag id from which CSS will be extracted and passed in the option above
  injectedCssTagID: string | null;
  // save applicant, but don't trigger checks
  saveOnly: boolean;
  documentUploads: null | boolean | DocumentUploadConfig;
}

type TDocumentTypes = (TSupportedDocuments | UserDocConfig | DocConfigBody)[];
type TSupportedDocuments = 'PASSPORT' | 'DRIVERS_LICENCE' | 'NATIONAL_HEALTH_ID' | 'NATIONAL_ID'
type UserDocConfig = { type: TSupportedDocuments } | TPassportConfig | TDriversLicenceConfig | TCustomDocumentConfig
type TPassportConfig = { type: "PASSPORT", idExpiry?: boolean }
type TDriversLicenceConfig = { type: "DRIVERS_LICENCE", digitalLicence?: boolean } // Note that digitalLicence is opt-OUT so it defaults to true
type TCustomDocumentConfig = {
  type: string;
  label: string;
  subtitle?: string;
  customEventPayload: { [key: string]: unknown };
}
type TConfigDOB = {
  type: TDOBTypeSupport
}

type TDOBTypeSupport = 'gregorian' | 'buddhist'

type DocumentUploadConfig = {
  uploads: DocumentUpload[]
}

type DocumentUpload = { title: string; description?: string; types: TDocumentUploadType[] }
type TDocumentUploadType = DocumentType | TDocumentUploadTypeObject
enum DocumentType {
    DRIVERS_LICENCE = "DRIVERS_LICENCE",
    PASSPORT = "PASSPORT",
    VISA = "VISA",
    IMMIGRATION = "IMMIGRATION",
    NATIONAL_ID = "NATIONAL_ID",
    NATIONAL_HEALTH_ID = "NATIONAL_HEALTH_ID",
    CONCESSION = "CONCESSION",
    HEALTH_CONCESSION = "HEALTH_CONCESSION",
    PENSION = "PENSION",
    MILITARY_ID = "MILITARY_ID",
    BIRTH_CERT = "BIRTH_CERT",
    CITIZENSHIP = "CITIZENSHIP",
    MARRIAGE_CERT = "MARRIAGE_CERT",
    DEATH_CERT = "DEATH_CERT",
    NAME_CHANGE = "NAME_CHANGE",
    UTILITY_BILL = "UTILITY_BILL",
    BANK_STATEMENT = "BANK_STATEMENT",
    BANK_ACCOUNT = "BANK_ACCOUNT",
    INTENT_PROOF = "INTENT_PROOF",
    SELF_IMAGE = "SELF_IMAGE",
    EMAIL_ADDRESS = "EMAIL_ADDRESS",
    MSISDN = "MSISDN",
    DEVICE = "DEVICE",
    VEHICLE_REGISTRATION = "VEHICLE_REGISTRATION",
    PROOF_OF_ADDRESS = "PROOF_OF_ADDRESS",
    EXTERNAL_ADMIN = "EXTERNAL_ADMIN",
    CHARGES = "CHARGES",
    PRE_ASIC = "PRE_ASIC",
    ANNUAL_RETURN = "ANNUAL_RETURN",
    REPORT = "REPORT",
    TRUST_DEED = "TRUST_DEED",
    PARTNERSHIP_AGREEMENT = "PARTNERSHIP_AGREEMENT",
    ADMIN_CHANGE = "ADMIN_CHANGE",
    COMPANY_REPORT = "COMPANY_REPORT",
    CHECK_RESULTS = "CHECK_RESULTS",
    OTHER = "OTHER",
    RENTAL_AGREEMENT = "RENTAL_AGREEMENT",
    TAX_STATEMENT = "TAX_STATEMENT",
    HOUSE_REGISTRATION = "HOUSE_REGISTRATION",
    YELLOW_HOUSE_REGISTRATION = "YELLOW_HOUSE_REGISTRATION",
    WORK_PERMIT = "WORK_PERMIT",
    EMPLOYMENT_CERTIFICATE = "EMPLOYMENT_CERTIFICATE",
    NOTARY_PUBLIC_ID = "NOTARY_PUBLIC_ID"
}
type TDocumentUploadTypeObject = { type: string; label: string }
- Once ready simply point your production SmartUI to:
<script src=“…/v4/ff-onboarding-widget.js”>
