
OneSDK for Fraud detection and prevention
When customers create an account using your application, you can evaluate potential fraud indicators from the characteristics of their device as well as all their form-filling behavior using OneSDK. Your registration process can retrieve the fraud risk associated with the device session and determine whether to allow the customer to onboarding.
In this tutorial, you'll learn how to integrate OneSDK into your application’s registration page.
By the end of this tutorial, you'll be able to:
- Integrate OneSDK into your login and registration flow.
- Assess device and customer fraud risk as part of your onboarding process.
Account configuration required
Device characteristics and behaviour biometrics must be configured for your account by FrankieOne. Please speak with your Customer Success representative if you are interested in this feature.
How it works
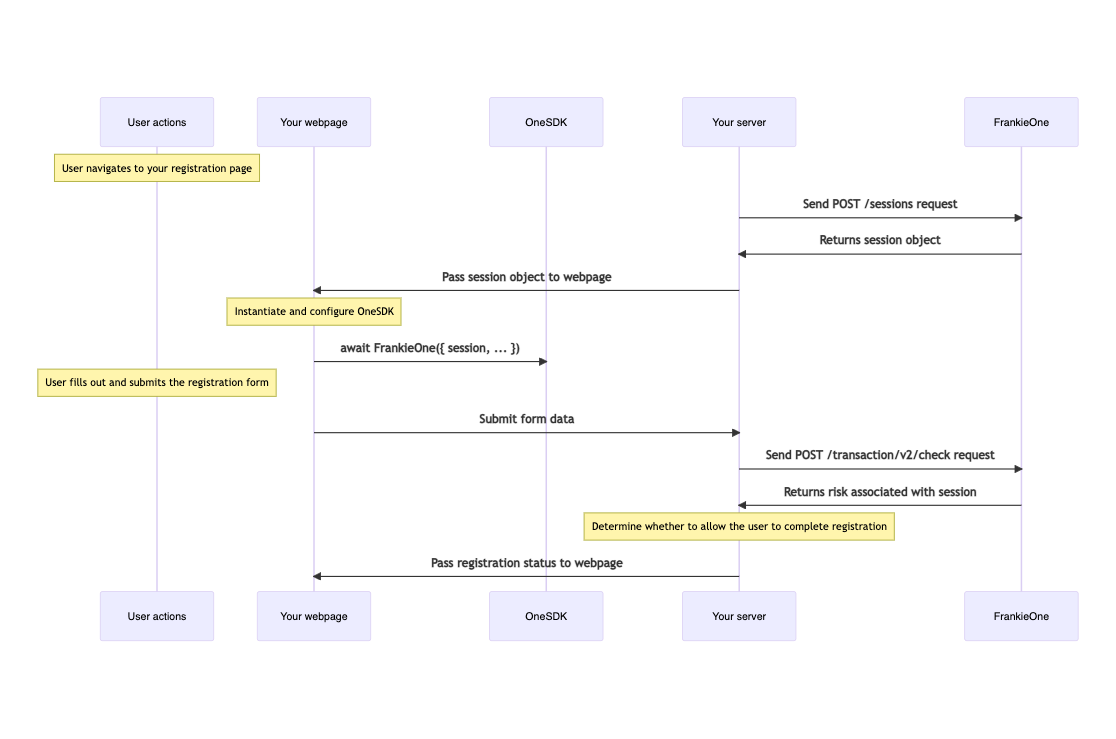
The user registration flow works as follows:
- The user navigates to your application webpage.
- Before serving the frontend, your server communicates with our server to create a temporary session object.
- Your server includes the session object as part of the frontend of your webpage.
- Your webpage initializes OneSDK using the session object from the server.
- OneSDK handles the collection of device intelligence data.
- Your webpage submits the user registration details.
- Your server retrieves fraud indicators from FrankieOne using the ID of the session it created earlier and determines how to proceed.
Before you begin
Before you start the tutorial, you should:
- Ensure you have a developer account with FrankieOne with a Customer ID and API Key (and optionally a Customer Child ID).
- Work with FrankieOne to ensure Device Characteristics and Behavioral Biometrics is enabled for your account.
Step 1: Create a session
Obtain a session on your backend and forward it to your frontend web page.
Construct the API credentials
- Serialize your FrankieOne API credentials to a string using : as a separator.
- Encode the resulting string using Base64 encoding.
If you are using a macOS or Linux operating system, run the following command in a terminal:
echo -n `CUSTOMER_ID:API_KEY` | openssl base64
const base64EncodedCredentials = Buffer.from(`${CUSTOMER_ID}:${API_KEY}`).toString("base64");
If you have a child account with FrankieOne, modify the above command to the following:
echo -n 'CUSTOMER_ID:CUSTOMER_CHILD_ID:API_KEY' | openssl base64
Obtain a temporary session token
Send a POST request to the /machine-sessions endpoint.
The appropriate URL for the machine-sessions endpoint depends on the environment you’re integrating with:
| Environment | URL |
|---|---|
| Demo | <https://backend.demo.frankiefinancial.io/auth/v2/machine-session> |
| UAT | <https://backend.kycaml.uat.frankiefinancial.io/auth/v2/machine-session> |
| Production | <https://backend.kycaml.frankiefinancial.io/auth/v2/machine-session> |
Pass the encoded credential in the Authorization request header using machine as the scheme:
Authorization: machine YOUR_ENCODED_CREDENTIAL
Include the following parameters in the body of the request:
| Parameter name | Required | Description |
|---|---|---|
| permissions | Required | A hash containing preset and entityId |
| permissions.preset | Required | The string one-sdk |
| permissions.entityId | Required, unless permissions.customerReference supplied | A string containing the entity ID for the individual being onboarding |
| permissions.customerReference | Required, unless permissions.entityId supplied. | A unique string representing an identifier managed by you for the individual being onboarding. |
The following example creates a session object for a user using an existing entity ID:
ENCODED_CREDENTIAL=$(echo -ne "$YOUR_CUSTOMER_ID:$API_KEY" | base64)

curl https://backend.demo.frankiefinancial.com/auth/v2/machine-session \
  -X POST \
  -H "Authorization: machine $ENCODED_CREDENTIAL" \
  -H 'Content-Type: application/json' \
  -d '{
    "permissions": {
      "preset": "one-sdk"
      "entityId": "YOUR_ENTITY_ID"
    }
  }';
const sessionObject = fetch(`${FRANKIE_URL}/auth/v2/machine-session`, {
  method: "POST",
  headers: {
    "Content-Type": "application/json",
    authorization: "machine " + Buffer.from(`${CUSTOMER_ID}:${CUSTOMER_CHILD_ID}:${API_KEY}`).toString("base64"),
  },
  body: JSON.stringify({
    permissions: {
      preset: "one-sdk",
      entityId: "YOUR_ENTITY_ID",
    },
  }),
}).then((response) => response.json());
Keep your credentials confidential
Do not publish your credentials to your frontend. They should remain accessible only from your server.
Sample response:
{
  "token": "eyJhbGciOiJIUzI1NiIsInR5cCI6IkpXVCJ9.eyJzdWIiOiIxMjM0NTY3ODkwIiwibmFtZSI6IkpvaG4gRG9lIiwiaWF0IjoxNTE2MjM5MDIyfQ.SflKxwRJSMeKKF2QT4fwpMeJf36POk6yJV_adQssw5c"
}
Step 2: Set up OneSDK
Use OneSDK to gather device intelligence and behavioral biometrics.
Install the SDK
The recommended way is to link to the SDK from a script tag, to ensure you always have the latest up to date version and continue to receive updates.
Embed script
<script src="https://assets.frankiefinancial.io/one-sdk/v0.4/oneSdk.umd.js"></script>
Using npm
Install the @frankieone/onesdk package:
npm install @frankieone/one-sdk
If you install OneSDK as an npm package, you are responsible for updating the version in your package.json file to ensure you always have the most up-to-date version.
Import the SDK into your application:
import OneSdk from '@frankieone/one-sdk';
Create a configuration object
Create an object for the global configuration of your SDK integration. This section shows the required and recommended parameters.
| Parameter name | Required | Description |
|---|---|---|
session | Required, unless mode is specified as "dummy". | The session object from your call to /machine-sessions. |
mode | Optional | One of "production" or "dummy". If this is specified as "dummy", then session does not need to be specified. The default value is "production". |
Sample configuration:
const configuration = {
    session: sessionObject // The session object returned from POST /sessions
};
Pass the entire object returned as the response of the /machine-sessions endpoint as the value for the session parameter. Do not extract the token or any other field from the response.
For example your server-side code may look like:
<?php $sessionResponse = createFrankieSession(); ?>
<script>
  const session = JSON.parse('<?php echo json_encode($sessionResponse) ?>'); // session is the object { token: "...." }
  const oneSdk = await OneSdk({ session });
</script>
Or in Node.js + Twig template engine
<script>
  {% set sessionObject = await createFrankieSession(); %}
  const sessionObject = JSON.parse("{{ sessionObject | json_encode | raw }}"); // session is the object { token: "...." }
  const oneSdk = await OneSdk({ session: sessionObject });
</script>
Initialize the OneSdk object
Create an instance of OneSDK using the configuration object you created.
The OneSdk function returns a promise, which can be await-ed in JavaScript ES2017's await.
const frankieOne = await OneSdk(configuration)
Otherwise you can use JavaScript's Promise API.
OneSdk(configuration).then((oneSdk) => {
  // The oneSDK instance is ready to use...
});
Once initialized, the SDK will install the device characteristics monitoring service on your page.
Step 3: Start capturing device characteristics
Use the device component provided by OneSDK to capture device characteristics and behavioral biometrics.
Create the device component
Create an instance of the Device Component by passing 'device' to the type in component(type) method of the FrankieOne object.
const device = oneSdk.component("device", {
  activityType: "REGISTRATION"
});
Start capturing device data
Start capturing device characteristics by calling the start() method.
device.start();
Step 4: Assess fraud risk
Within your server's user registration handler, Use the Assess Risk API to evaluate fraud risk associated with the user's session.
In the sample code below:
- Replace SESSION_ID with the value of the id property from the session object that you created earlier.
- Replace USER_ID with a unique identifier for the user. This may be the username or email value from your registration form.
- Replace CHECK_ID with a unique, randomly generated identifier.
curl https://api.demo.frankiefinancial.com/transaction/v2/check \
  -X POST \
  -H 'X-Frankie-CustomerID' \
  -H 'Content-Type: application/json' \
  -d '{
      "riskToken": {
        "sessionKey": "SESSION_ID",
        "userId": "USER_ID"
      },
      "checkId": "CHECK_ID",
      "activity": {
        "activityType": "REGISTRATION",
        "timestamp": "2022-01-01T00:00:00"
      }
  }'
The response will contain a riskLevel and riskResults fields, which you can use to assess the overall risk of the registration activity.
Depending on the overall risk, you may allow the user to register and start the KYC process, or prevent the user from proceeding if the risk level is too high.
Summary
In this tutorial, you learned how to:
- Install OneSdk on your application’s frontend webpage
- Assess fraud risk using device characteristics and behavioral biometrics
- Handle logins by updating the client-side session
Next steps
Complete onboarding:
- Start the KYC process for the new user.
Ongoing fraud monitoring:
- Update the SDK session with the customer's details upon successful registration.
List of Activity Type supported currently are LOGIN, REGISTRATION, CRYPTO_DEPOSIT, CRYPTO_WITHDRAWAL, FIAT_DEPOSIT, FIAT_WITHDRAWAL that ties user session with activity risk API. Refer https://apidocs.frankiefinancial.com/reference/assessrisk for API details. - Use the SDK to evaluate fraud indicators at other points in the customer lifecycle.
Updated 3 months ago