
Hosted OneSDK (Low-Code)
An alternative low-code integration for customers that want to onboard as soon as possible with as litle as possible.
Hosted OneSDK Monthly subscription
Hosted OneSDK is a service available through a monthly subscription. To subscribe, please contact your customer success manager. Our team will take care of the setup process for you.
Introduction
Hosted OneSDK offers a low-code solution, allowing customers to easily integrate with FrankieOne services with little to no code.
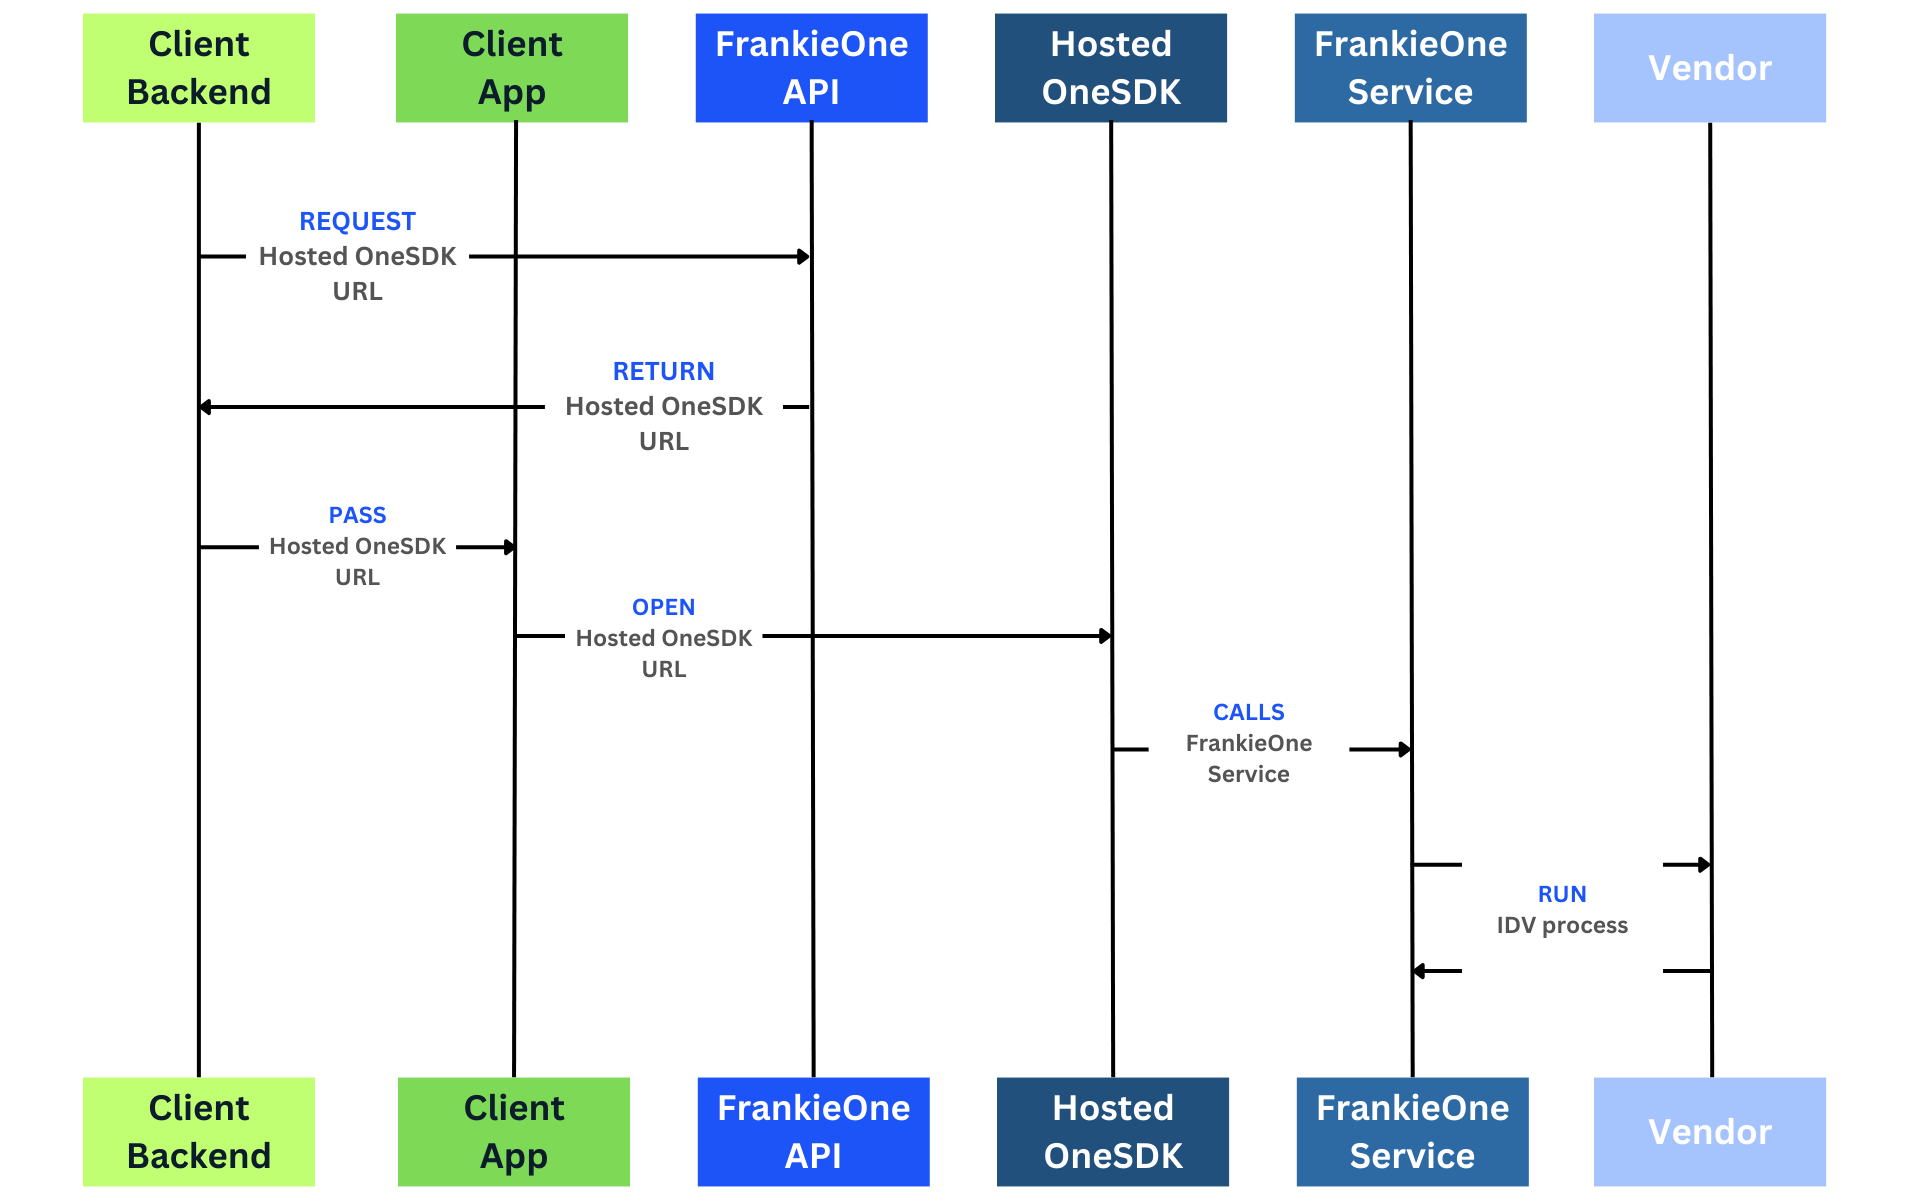
Hosted OneSDK automatically updates, ensuring a consistent, secure, and compliant integration. This reduces engineering and security efforts, helping you go live faster.
✅ Benefits
The FrankieOne Hosted OneSDK solution provides enterprise clients:
-
One API integration for both Web and Mobile applications with all the IDV vendors is covered in the same API
-
An onboarding URL that is hosted and managed by FrankieOne.
-
The ability to send the URL via SMS or easily open it within mobile and web applications via iFrame or WebView
-
Have the Send Biometrics link in Portal, which is also available for individual and UBO/Associated entities in Portal
-
FrankieOne manages the URL, so customers don't need to install OneSDK. New features can be auto-enabled or you can choose to use the stable version.
-
A seamless, low-code integration for faster development and market entry.
-
Improved end-user onboarding by allowing onboarding links to be sent via the FrankieOne Portal, reducing time spent on issues and process re-initiations.
Integration
To integrate FrankieOne Hosted OneSDK, just generate an onboarding URL and use it in your mobile or web app to onboard users.
Step 1. Generating an onboarding URL using API
To generate the URL, use Hosted Onboarding API with the following sample body request. There are a couple of pre-defined flowIds you can use:
| flowId | Description |
|---|---|
doc_upload | Requesting additional documents to be attached to a business entity |
idv | All in one IDV flow to capture OCR and Biometrics |
idv_review | All in one IDV flow to capture OCR and Biometrics with review screen to allow user to edit extracted information |
manual_kyc | eKYC only flow (Manual capture) |
ocr_only | Only capture OCR without Biometrics |
To see the UI screens for each flow, please visit: Hosted OneSDK Flows screens.
Sample Request - New customer reference
{
    "applicationRef": "UNIQUE_APPLICATION_REF",
    "customerRef": "UNIQUE_REFERENCE",
    "consent": true,
    "flowId": "idv",
    "phoneNumber": "04xxxxxxxx",
    "phoneCode": "+61",
    "recipientName": "TEST",
    "sendSMS": true
}
Sample Request - Existing entityId
{
    "consent": true,
    "phoneNumber": "04xxxxxxxx",
    "phoneCode": "+61",
    "flowId": "idv",
    "sendSMS": true,
    "entity": {
        "entityId": "",
        "addresses": [
            {
                "country": "AUS"
            }
        ],
        "extraData": [
            {
                "kvpKey": "application_reference",
                "kvpType": "id.external",
                "kvpValue": "<UNIQUE_APPLICATION_REF>"
            },
            {
                "kvpKey": "customer_reference",
                "kvpType": "id.external",
                "kvpValue": "<UNIQUE_REFERENCE>"
            }
        ],
        "name": {
            "displayName": "",
            "familyName": "Test",
            "givenName": "Test",
            "honourific": "",
            "middleName": ""
        }
    }
}
Sending the Onboarding URL through SMS
To send the onboarding link via SMS to the end-user's mobile phone, provide the
phoneNumberand setsendSMStotrue. This will send an SMS with the onboarding link which directs the user to the FrankieOne onboarding page. The SMS content and URL expiry can be customized—contact Technical Support for help with this.
Sample Response format
{
  "status": "success",
  "url": "https://verify.uat.frankie.one?=vJ2GKbXSHkVyt3e3uSXNk2",
  "urlExpiry": "string",
  "entity": {...}
 }
The Onboarding URL will be returned ("url": "value"). You can take this value and share it with your end-user to complete the onboarding process.
Here's the complete response format:
{
  "status": "success",
  "url": "https://verify.uat.frankie.one?=vJ2GKbXSHkVyt3e3uSXNk2",
  "urlExpiry": "string",
  "entity": {
    "addresses": [
      {
        "addressId": "string",
        "addressType": "string",
        "buildingName": "string",
        "careOf": "string",
        "country": "string",
        "endDate": "string",
        "extraData": [
          {
            "kvpKey": "string",
            "kvpType": "string",
            "kvpValue": "string"
          }
        ],
        "longForm": "string",
        "postalCode": "string",
        "region": "string",
        "startDate": "string",
        "state": "string",
        "streetName": "string",
        "streetNumber": "string",
        "streetType": "string",
        "suburb": "string",
        "town": "string",
        "unitNumber": "string",
        "unstructuredLongForm": "string"
      }
    ],
    "dateOfBirth": {
      "country": "string",
      "dateOfBirth": "string",
      "locality": "string",
      "unstructuredDateOfBirth": "string",
      "yearOfBirth": "string"
    },
    "entityId": "string",
    "entityProfile": "string",
    "entityType": "string",
    "extraData": [
      {
        "kvpKey": "string",
        "kvpType": "string",
        "kvpValue": "string"
      }
    ],
    "gender": "string",
    "identityDocs": [
      {
        "country": "string",
        "createdFromScan": true,
        "documentId": "string",
        "documentStatus": "string",
        "extraData": [
          {
            "kvpKey": "string",
            "kvpType": "string",
            "kvpValue": "string"
          }
        ],
        "idExpiry": "string",
        "idIssued": "string",
        "idNumber": "string",
        "idSubType": "string",
        "idType": "string",
        "manuallyModified": true,
        "region": "string"
      }
    ],
    "name": {
      "displayName": "string",
      "familyName": "string",
      "givenName": "string",
      "honourific": "string",
      "middleName": "string"
    }
  }
}
To learn more about our onboarding API, please visit the Onboarding API reference.
Step 2. Update entity profile (Optional)
Once you generate the onboarding URL, grab the entityId from the previous API call and update the entity profile to use a recipe you want to run a verification check. To do this, use Update Entity API and the following sample body request to update theentityProfile:
{
    "entityId": "string", // entityId from the previous API call
    "entityProfile": "string" // Use a recipe that has been configured in your account
}
Alternatively, if you don't update theentityProfile, the default recipe in your account will be used for verification.
Step 3. Open the Onboarding URL
You can now open the URL on your mobile or desktop browser, or native application using Webview.
For example, the generated Onboarding URL is https://verify.uat.frankie.one?t=dFLfq4pbfMfnWUZ4SR8W5i.
You can use this URL in your native application as in the following examples:
Sample code for Android Java:
You can use the following example for your Android app using WebView:
webAppInterface = WebAppInterface(requireContext())
        binding.webView.apply {
            webViewClient = MyWebViewClient()
            webChromeClient = MyWebChromeClient()
            addJavascriptInterface(webAppInterface, "Android")
            loadUrl("https://verify.uat.frankie.one?t=dFLfq4pbfMfnWUZ4SR8W5i">)
        }
Sample code for React Native:
You can use the following example for your React Native app using the in-app browser:
import { useState } from 'react';
import { Button, Text, View, StyleSheet } from 'react-native';
import * as WebBrowser from 'expo-web-browser';


export default function App() {
  const [result, setResult] = useState(null);

  const handlePressButtonAsync = async () => {
    const result = await WebBrowser.openBrowserAsync('https://verify.uat.frankie.one?t=dFLfq4pbfMfnWUZ4SR8W5i');
    setResult(result);
  };

  return (
    <View style={styles.container}>
      <Button title="Open WebBrowser" onPress={handlePressButtonAsync} />
      <Text>{result && JSON.stringify(result)}</Text>
    </View>
  );
}

const styles = StyleSheet.create({
  container: {
    flex: 1,
    alignItems: 'center',
    justifyContent: 'center',
    backgroundColor: '#ecf0f1',
  },
});
Additionally, to learn more about using OneSDK with native apps, visit Using OneSDK with native apps.
Using the Portal to send onboarding URL.
The Hosted OneSDK Onboarding URL can also be sent to the onboarding end user using the Portal.
Enable Onboarding URL sending through the Portal
The feature to send the Onboarding URL using the Portal is enabled through your application configuration settings, and done by FrankieOne during your onboarding.
To enable or disable it for your account, please contact Technical Support.
If this feature is enabled during your onboarding with FrankieOne, you can send the Onboarding URL to your end users through the Portal.
To do so, do the following steps:
-
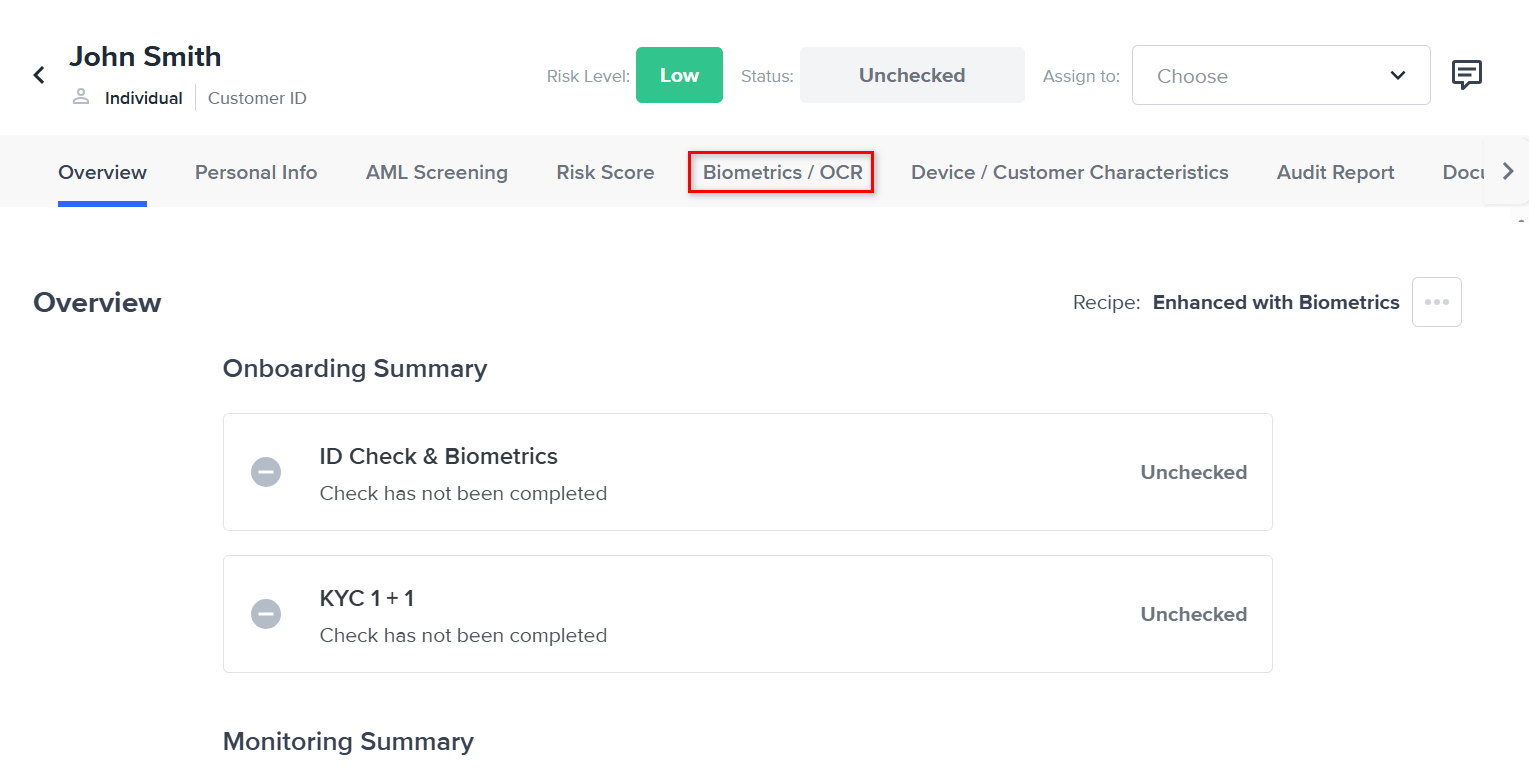
Open the entity profile page of the end-user. (If the entity hasn't been created, select the New Profile button to create a new one.)
Profile page
-
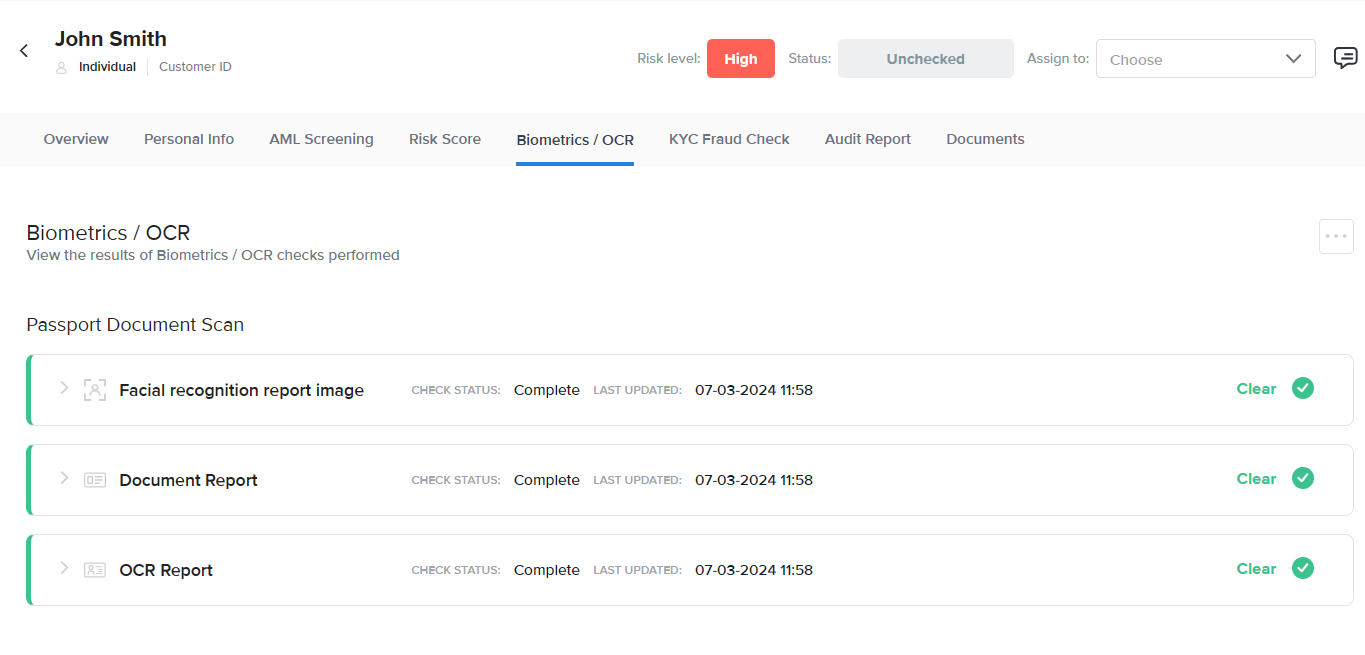
Select the Biometrics/OCR tab.
-
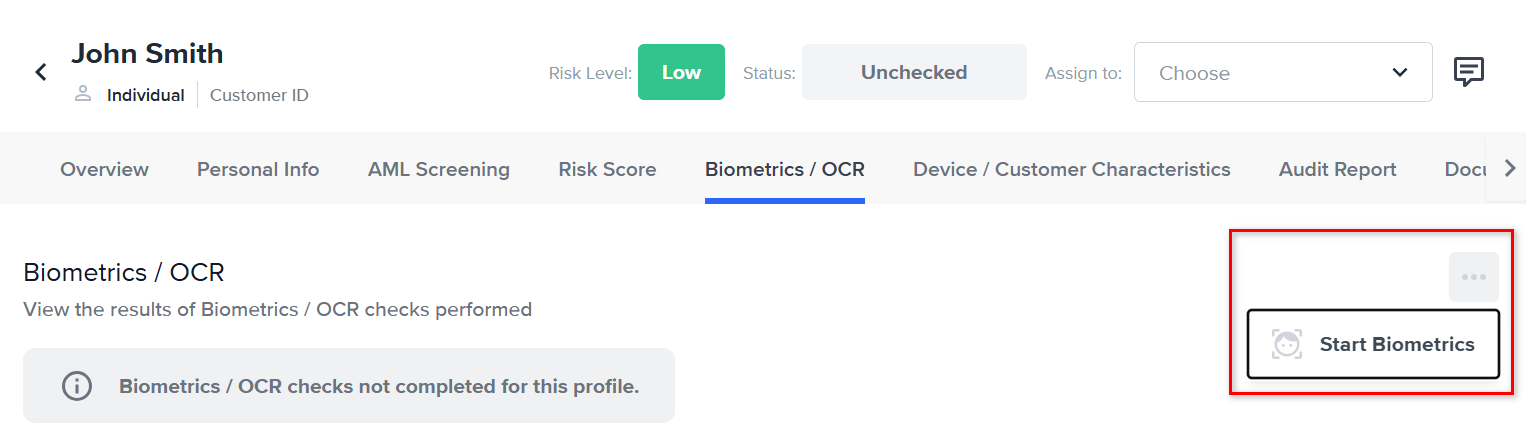
Open the Biometrics menu on the left side and select Start Biometrics. This will open the Start Biometrics/OCR process modal.
-
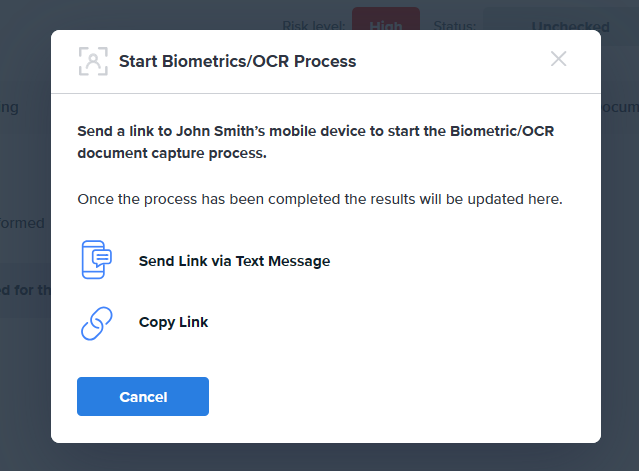
Select how you want to send the Onboarding URL to your end user, either by SMS or by copying the link and sharing it with them.
Start Biometrics/OCR Process modal.
-
If you select, Send Link via Text Message, you'll need to enter the mobile phone number of the end user, and any internal comments you want to add. Select Send Link to send the Onboarding URL.
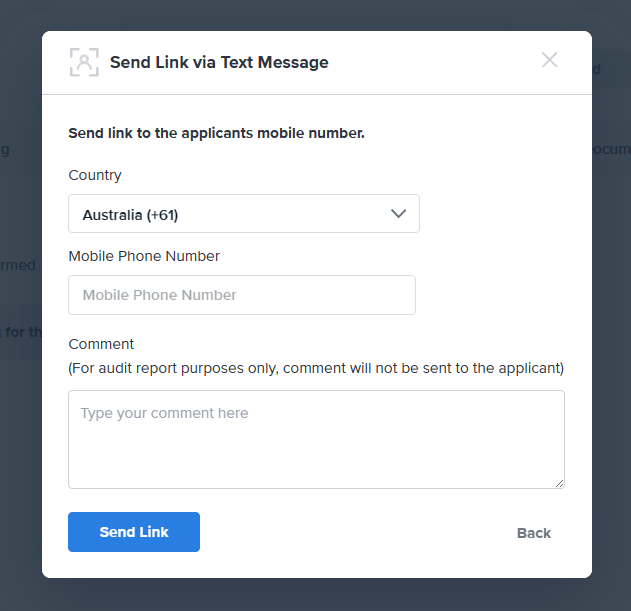
Send Link (Onboarding URL) via Text Message.
-
If you select Copy Link, you'll have the link to copy and share. Select Copy. Select Done afterwards.
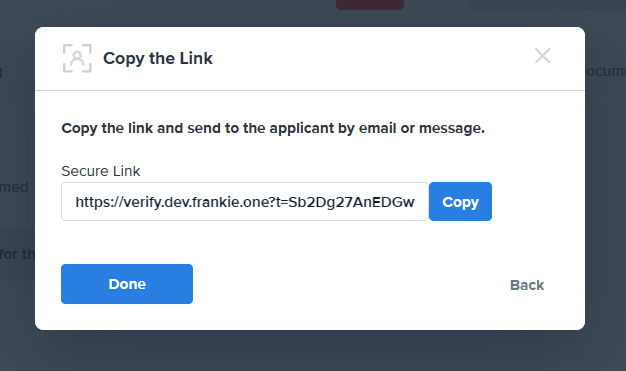
Copy Onboarding URL modal
The end user must open the Onboarding URL on their mobile device to complete identity verification using the phone’s camera for OCR and liveness checks.
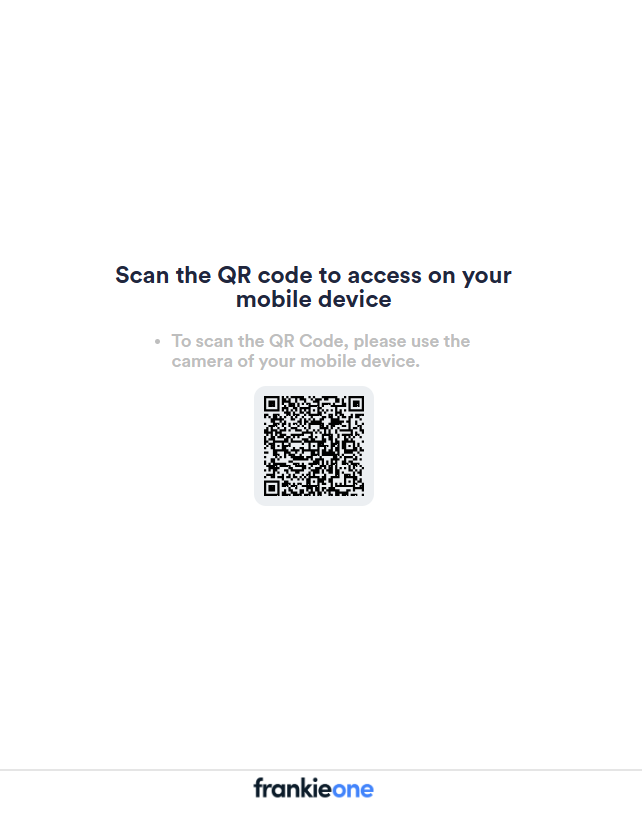
QR code to open the Onboarding URL on a mobile device.
After the end user completes the onboarding steps on his mobile device, the entity profile will be updated with the collected information.
Once the information has been collected and added to the entity profile, you can continue managing the profile.
Document Upload for KYB
To send a link to a third-party entity to upload a requested document for a business entity, follow these steps:
Make an API call to the onboarding-url API endpoint to generate the link.
onboarding-url API endpoint to generate the link.Endpoint
POST https://api.latest.frankiefinancial.io/idv/v2/idvalidate/onboarding-urlHeaders
X-Frankie-Customerid: YOUR_CUSTOMER_ID
X-Frankie-CustomerChildID: YOUR_CUSTOMER_CHILD_ID
api_key: YOUR_API_KEY
Specify the requested documents in the request body.
Body
{
  "flowId": "doc_upload",
  "senderName": "OneSDK-Testing-Sender-Name",
  "requestedDocuments": [{
      "documentType": "BANK_STATEMENT"
    },
    {
      "documentType": "TRUST_DEED"
    }
  ],
  "entity": {
    "entityId": "bc335f79-c167-36f6-3c70-d3c0a2d8c8b8"
  }
}
Retrieve the onboarding URL from the API response.
Response
After a successful request, you will get a response with the onboarding URL, similar to the sample response below:
{
    "status": "success",
    "url": "https://verify.dev.frankie.one?t=KpnScuFzWVmCN64ZZUKU9g",
    ...
}
Take note of this onboarding URL.
Forward the onboard URL to the third party.
Share the onboarding URL with the third party. Once accessed, they’ll complete the forms, upload their documents, and see a success or error message based on the outcome.
Review the documents in the Portal.
Once uploaded, the documents will appear in the business entity's "Supporting Documents" tab in the Portal.
Updated 2 months ago