
OneSDK for Federated Identity
A federated identity is a method of linking a user’s identity across multiple separate identity management systems. It allows users to quickly move between systems while maintaining security.
Single sign-on (SSO) is a subset of federated identity management, in which a user's single authentication token, is trusted across multiple IT systems.
OneSDK Federation component
The OneSDK’s Federation component will be capable of importing data from various IdPs (Identity Providers) such as Google, Facebook, OKTA and any other provider that supports OpenID Connect/ OAuth2. Depending on the data source, the fetched information will be considered pre-verified.
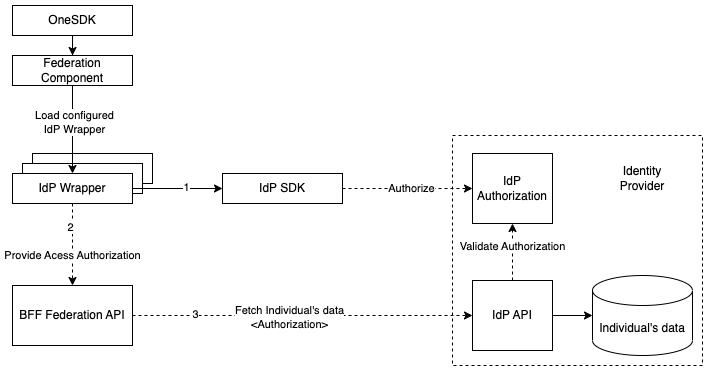
Similar to other OneSDK components, the Federation component consists of a set of Vendor Wrappers. Each wrapper represents a different IdP. Even though vendors follow the same protocol, sometimes they differ slightly. Some might have an SDK that takes care of initialising the authorisation/redirection flow and others might require a few extra parameters to be included in the requests. For vendors without an SDK, the authorisation is usually done with a regular browser redirect that must follow their own standards on top of OAuth2 and should be described in their own documentation. The OneSDK abstracts all those differences in a single simple-to-use JavaScript interface.
const oneSDK = await OneSdk({ session });
const federationComponent = oneSDK.component("federation");

federationComponent.on("results", (individual, status, approve) => {
  showIndividualForApproval(individual);
  approve();
});
federationComponent.start();
You can find more details about each IdP we integrated with in the following pages.
What is Singpass?
Singpass is an IdP that is part of the Singaporean Government's National Digital Identity (NDI) Initiative, providing better convenience and security for Singaporean users when transacting online. By using Singpass, details can be transacted securely to the public and private sectors.
Singpass is a critical part of identity verification, making this process straightforward and simple. It is used to quickly identify an individual, allowing for a single action by the users to provide the required personal data. Users would need to provide explicit consent to provide their details.
Link-Up Submission
To be able to connect to Singpass, it is necessary to submit the expected user journey and captured data points for approval by Singpass via Assurity on the Singpass API Dev portal.This submission is necessary when the following occur:
- Creating a new user journey
- Modifying an existing journey
- Capturing a new data set
- Modifying an existing data set
It is crucial this approval process is performed early, as this process will take at least 2 weeks to be processed. Please refer to Reference Journey for more info.
Data attributes
As part of the LinkUp application, you need to apply for the individual data attributes you're looking for. For eKYC requirements in Singapore, we strongly recommend applying for the following attributes at minimum:
- uinfin
- name
- aliasname
- hanyupinyinname
- hanyupinyinaliasname
- residentialstatus
- nationality
- dob
- regadd
- email
- mobileno
- passportnumber
- passportexpirydate
- passtype
- passstatus
- passexpirydate
OneSDK Federation flow
As an initial proof of concept, we integrated with Singpass through MyInfo API. It's based on OAuth2 flow to perform authorisation & authentication.
](https://files.readme.io/2196500-myinfo-rebrand-overview.png)
Overview of MyInfo/ Singpass Integration
Ref: Singpass API
Since the OAuth2 flow is implemented with two browser redirects, we split the end-to-end flow into two parts: Authorisation and Approval. All the details described below are handled by OneSDK internally and you may skip directly to the Getting started section.
1 - Authorisation
The Authorisation is handled at the frontend with a simple redirect to the authorisation page, whose URL is taken from a pre-defined configuration. The redirect includes some extra parameters:
client_id, pre-configured Singpass application id. Provided with the configuration.attributes, list of Singpass user attributes. It needs to match the pre-configured list of attributes. Provided with the configuration.state, session id generated by BFF when the current OneSDK session was created and can be extracted from the session token itself (JWT). This is a requirement and guarantees the data is authorised and retrieved by the same agent.redirect_uri, the url to redirect the browser after Authorisation is confirmed. Provided with the configuration.purposesome hard-coded value required by Singpass. Provided with the configuration.
Callback (redirect) URL
The OAuth2 flow is based on the callback mechanism, so the client application needs to initialise OneSDK component in two separate instances, initially before the redirect and after returning to the callback page.
The configured callback url may be the same page as the initial page.
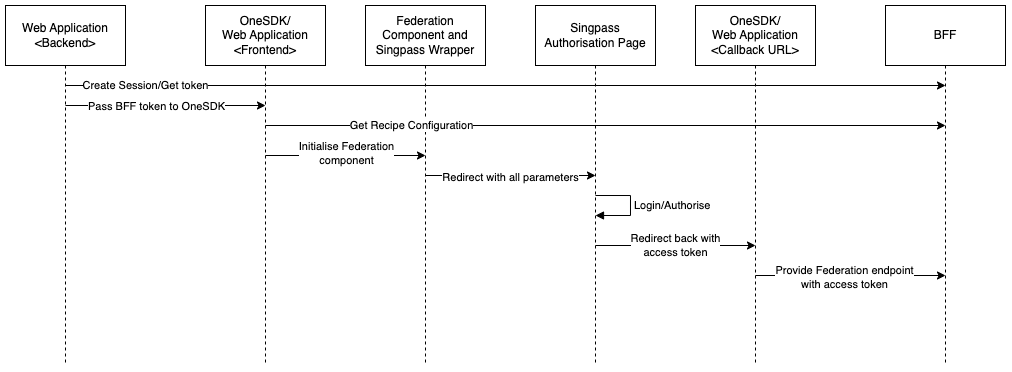
Flow:
- The application’s backend generates a session with BFF, which returns a token containing a session id.
- The OneSDK is initialised using that token.
- The OneSDK uses the token to fetch the corresponding Customer Recipe configuration.
- The application initialises the OneSDK Federation component which will store the current token in the browser's temporary Session Storage (similar to LocalStorage).
- The application then calls the start method, which detects the configuration for Singpass IdP and starts the Singpass wrapper.
- The Singpass wrapper will then use the loaded Recipe configuration to appropriately redirect the browser to the Singpass Login/Authorisation page.
- Once the user successfully logs in and authorises the flow, Singpass will return the browser to the configured redirect_uri (aka the callback url) with the authorisation code included as a url parameter.
- The page sitting in the callback url will again initialise both the OneSDK (using a new/unrelated token) and the Federation component, which will in turn reuse the same token stored in the temporary storage.
- The same page will again call the start method, which will
- initialise the Singpass Wrapper internally
- detect the authorisation code in the url
- submit the authorisation code to BFF with the reused token, instead of the new provided token
- BFF will connect to Singpass/MyInfo to exchange the authorisation code with an access token.
- With the access token, BFF will connect to Singpass/MyInfo again to retrieve the Individual’s information. BFF will then cache the data and return it to OneSDK.
As seen above, the authorisation flow requires some static configuration. That configuration will be handled by FrankieOne internally so the OneSDK's initialisation is as simple as possible.
2 - Approval
The Approval flow is when the Individual information is successfully retrieved. If everything goes as expected, a results event is emitted that contains the Individual data, a status and an approve callback.
The approve callback should be called when the user confirms the information at the frontend. Once it is called, a request will be sent to BFF to import the cached Individual's data and create an entity in FrankieOne platform. The cached data expires after 30 mins by default, so if the user doesn't approve within this time, you will get an error after.
For more information on how the pre-verified data will be imported to FrankieOne platform, please refer to import past kyc check data.
Getting started
As mentioned above, the Federation flow is split into two parts, where the OneSDK needs to be initialised separately. The steps are the same for both parts:
- create an instance of the OneSDK
- create an instance of the Federation component
- listen to the results and error events
- call the Federation component's method "start".
Error payloads will be described later.
// 1
const oneSDK = await OneSdk({ session });

// 2
const federationComponent = oneSDK.component("federation");

// 3
federationComponent.on("error", ({ message, payload }) => {
   console.log(message, payload);
});

// The results event will only be triggered in the Callback page and may be skipped initially
federationComponent.on("results", (individual, status, approve) => {
  showIndividualForApproval(individual);
  approve();
});

// 4
federationComponent.start();
For now, the value of the second parameter "status" in the "results" event should be ignored as it might still change. Whenever the results event is fired, individual is always expected to have data.
Sample HTML code
Here is a sample HTML code running on the OneSDK RC branch and using the Singpass sandbox environment.
<html lang="en">
  <head> </head>
  <title>oneSdk onboarding</title>
   <script src="https://assets.dev.frankiefinancial.io/one-sdk/RC/oneSdk.umd.js"></script>
  <script>
let federationComponent;
async function startOneSdk() {
    const sessionObjectFromBackend = { "token": "eyJhbGciOiJIUzI1NiIsInR5cCI6IkpXVCJ9.eyJkYXRhIjp7Im9yZ2FuaX..."};

    const oneSdk = await OneSdk({
        session: sessionObjectFromBackend,
    });

    federationComponent = oneSdk.component("federation");

}

function startFederation() {
    if (!federationComponent) alert("Federation not initialised yet");

    federationComponent.on("results", async (individual, status, approve) => {

        console.log(individual);
        await approve();

    });

    federationComponent.on("error", ({ message, payload }) => {
      console.log(message);
    });

    federationComponent.start();

}

</script>
</head>
<body style="background-color: blue" onload="startOneSdk()">
    <button onclick="startFederation">Sign up with Singpass</button>
</body>
Error codes and messages
When you start the federation component, once there's an error either from the provider or Frankie internal service, you will receive an error event, in which there's an error message along with errorCode. If the error is from the provider, you will also get an issue object with more details.
federationComponent.on("error", ({ message, payload }) => {
  console.log(message, payload);
});
Sample error response:
Failed sending authorisation: "Could not fetch profile from singpass"
errorCode: "VENDOR_BAD_REQUEST"
issues: undefined
Provider errors
| Error code | Possible error messages | Notes |
|---|---|---|
| "VENDOR_SERVER_ERROR" | "server error" | The provider is not available or responsive. |
| "VENDOR_UNAUTHORISED" | "Invalid authorisation for ${providerName}" | Unauthorised error code from the provider, possibly due to invalid header parameters. |
| "VENDOR_BAD_REQUEST" | 1. "Incorrect parameter" 2. "Could not fetch profile from ${providerName}" 3. "Could not transform profile from ${providerName}" | We couldn't fetch the token or data due to a bad request or missing mandatory attributes. If any of the mandatory data attributes are missing from the fetched data, the Frankie service won't be able to proceed with eKYC process as it requires those attributes. In this case, you will get one of the following issue codes: 1. "MANDATORY_NAME" 2. "MANDATORY_DOB" 3. "MANDATORY_REGADD" 4. "MANDATORY_UINFIN" 5. "VALIDATION_COUNTRY" |
| "VENDOR_ACCESS_DENIED" | 1. "There was an issue fetching access token from ${providerName}" 2. "User denied the access" | There's an issue with the authorisation code. Either we received an invalid or expired code, or the user didn't authorise. |
| "VENDOR_FORBIDDEN" | "Invalid attributes for ${providerName}" | Forbidden error code from the provider, possibly something wrong with requested data attributes. |
| "VENDOR_DATA_EXPIRED" | "The data has expired or does not exist" |
Internal service errors
| Error code | Error message | Potential reasons |
|---|---|---|
| "INVALID_CONFIG" | "The auth config for ${providerName} is not valid" | The configuration for the federation process is invalid or not set up correctly. |
| "BAD_REQUEST" | "Unexpected data attribute" | Retrieved data attributes don't match the configured ones. |
| "SERVER_ERROR" | "Unable to process the data" | After fetching the data from the provider, if we're not able to read, decrypt, or process the data, you will get this error. |
Updated 9 months ago