IDV Service Flows
FrankieOne has integrated with a number of ID Verification (IDV) services (speak with our sales team for the latest list. This article refers to Onfido, but applies to all supported services).
These are services that can:
- capture photos of identity documents (OCR Capture)
- capture selfie pictures/videos (Biometrics capture)
- validate the photo of the ID for evidence of forgery, tampering, etc (Document report)
- compare the selfie with the photo on the ID for facial similarity (Facial Similarity report)
For the best customer experience, you should use their supplied SDKs (both for web and native) in your applications to manage the actual photo/selfie process, as they have a number of inbuilt features designed to capture the best images for use in the IDV process . In order to activate those SDKs, you usually need 2 items:
- An
applicantID- which is a unique identifier the SDK will use to upload data to the IDV service. - A time-limited, single-use token that will be used to authenticate the applicant ID via the SDK.
The FrankieOne API offers up 2 calls that can be used to obtain a token:
These will allow you to create/update an entity, then obtain a new token.
Calls to these endpoints will generate a token and applicantId that can then be passed to the SDK when it is activated in your native/web application.
Once your app has completed capturing the images, you then need to let us know it's time to gather the data and run the comparison process. You do this with a call to the following endpoint:
This call will allow you to update any further entity details captured before we start downloading data. The download process can take anywhere from 1 to 5 minutes due to the fact that Frankie uses service providers that have human failover checks when the AI components cannot fully analyze the ID document images.
Pro Tip
FrankieOne recommends that OCR data should not be relied upon to capture pre-populated fields. Whilst very good and accurate in the majority of cases, the time taken (see above) and potential for mistakes can lead to a poorer customer experience.
We recommend that details are captured manually and use the OCR process to verify that the data the users entered matches what was scanned in order to maintain the chain of trust.
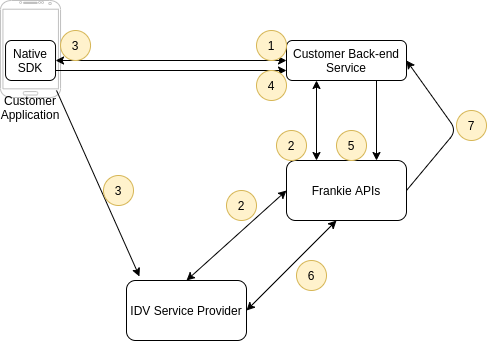
The following diagram describes the flow in more detail:

- The SDK or Service indicates that a document capture and facial similarity comparison is needed and thus a token is required.
User data such as a name (at a minimum), date of birth, address, and even the ID document data can be collected at this time if available.
- Customer's Back-ends services call the FrankieOne getToken API, passing through what user data is available, along with application IDs (for native apps) or a referrer domain URL (for web apps).
FrankieOne will then obtain a token and applicantID from your configured service provider and return those to the calling Back-end Service.
- The
applicantIDand token are supplied to the SDK which is then activated.
It will then guide the user through the ID and selfie capture process. These documents will be uploaded to the service provider directly.
-
The app will then inform the Customer Backend Service that the capture process is complete and pass on any additional user data obtained (address, etc)
-
The Backend Service will call the initProcess API, updating the user data if available.
-
The FrankieOne service will then proceed to download the image and report data and save that into the database. It is recommended that you background this call as it can take several seconds to initialise.
Once all the data has been downloaded, the FrankieOne service will proceed with incorporating the results into the overall risk profile of the user.
- Once the risk assessment is complete, a notification webhook is pushed to the Customer service with the latest risk assessment results.
All of the captured images/videos as well as the full IDV process results are then available through the Frankie portal, or via our GET entity API calls.
Updated about 1 year ago
